Account
Policy
Privacy
Security
Usage Monitor
FAQs
To review the list of IPs allocated to your zone, simply navigate to ‘My proxies page’, click on your Proxy zone, scroll down to the ‘Allocated IPs’ section, then simply click ‘Show allocated IPs’ or ‘Download IPs list’.

There are 2 ways to view your zones statistics:
- To see stats across all your zones, go to your dashboard:
- To see stats for a specific zone, go to that zone’s settings and click the “statistics” tab:
By default, all proxy zones have unlimited usage, and you can set a limit by one of 4 parameters:
- $/day
- $/month
- bytes/day
- bytes/month
To set this limit on one of your zones, from Bright Data’s ‘My proxies page’
Go to any of your zone's settings by clicking on that zone.
Go to the "Access parameters" tab.

Scroll down to "Limit", the default value is "unlimited"
Click the "edit" button

Enable the "spend limit" option.

Set the parameters you wish to work with and click "update"
You'll see the change back in the Limit section and the proxies page, in the Usage/Spend Limit column.
How did we calculate this table?
Your company needs to collect information from the web by sending 1,000 http requests per hour to a specific website. You write the scraper code and run it through a server. The target website allows 50 requests per minute from the same IP before blocking your scraper. Now, you have to purchase more proxies.
Assuming you choose datacenter proxies:
You don’t want to share IPs, so you buy 200 dedicated data-center IPs. You code the integration of the scraper with the new data-center proxies for 2 hours and then run the new program. This time, it takes 3 days for your target website to detect your scraper. Once your proxies are detected, you’ll have to purchase new proxies and repeat this process again, checking each day to make sure the proxies haven’t been detected. Cost per month (all numbers are from real customers):
- 200 dedicated IPs: $500
- Bandwidth: (1000 request X 20KB per request X 24 hours X 30 days = 14.5GB): $3 per month
- Developer (2 hours integration X 10 + 1 hour every 3 days for managing the proxies): ~3 days of work a month or ~$900
Your total cost per month will be at least $1400 for just these things alone, and the salary of $30 per hour for a developer is very conservative. Additionally, this doesn’t account for a lack of information reliability if your target website sends misinformation before blocking you or if your information flow is cut every few days, which can be detrimental to your brand or your revenue stream.
Assuming you choose Bright Data residential proxies:
You buy a basic package of 40GB with access to unlimited residential IPs. It takes 2 hours to integrate your scraper. Due to an average of 3 million residential IPs available each day, your target website can’t detect your scraper, allowing you to focus on other projects.
The bandwidth and unlimited IPs cost just $500 per month. Your information is always reliable because your requests are always successful and access is never cut in the middle of the month. When your business grows as a result of this scraping and your projects exceed 600MB each month, the difference in costs can be much higher than just ~$1000.
Bright Data also allows you to suspend your account when not in use, so your cost can be lower than $500 per month. Start by using the $5 voucher for free data-center traffic to test Bright Data’s benefits and then ask for access to our residential network for cheap and reliable data collection.
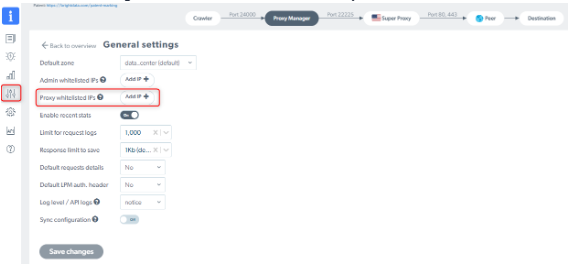
You can choose what external IPs are allowed to target the proxy ports without passing credentials or getting blocked. There are 3 levels of permissions granted when whitelisting on the Proxy Manager:
- IPs that are allowed to access the UI. These IPs are automatically allowed to access all Proxies and ports. Navigate to “General settings” and select “Add IP” for “Admin whitelisted IPs”.
- IPs that are allowed to access all Proxies. These IPs can access all ports. Navigate to “General settings” and select “Add IP” for “Proxy whitelisted IPs”.
- IPs that are allowed to access a single port. These IPs can access the only port they are assigned to. Navigate to the port settings (simply click on the port itself)
Navigate to “General” and select “Add IP” for “Whitelisted IPs”.


This method requires an Authentication token.
Run this command in the remote server:
curl -X GET "http://127.0.0.1:22999/api/gen_token" -H "accept: application/json"
This will generate an authentication token for you:
"token":"<TOKEN_STRING>"
Now:
- Copy the token from Proxy Manager server to new crawler server
- Make this request from your new server:
curl <remote-server-IP>:22999/api/add_wip \
  -X POST -H "Content-Type: application/json" \
  -H "Authorization:<TOKEN_STRING>" \
  -d '{"ip":"<CRAWLER_IP>"}'
The crawler’s IP is now whitelisted on the Proxy Manager.
Whitelisting in this method grants permission to access all ports, not to the Proxy Manager UI/Admin Panel.
This workflow is optimal when using multiple crawlers with rotating IPs that target the Proxy Manager installed remotely. This method requires an Authentication token.
Run From inside the remote server the next command in Terminal/CMD
curl -X GET "http://127.0.0.1:22999/api/gen_token" -H "accept: application/json"
This will generate an authentication token for you:
"token":"<TOKEN_STRING>"
Now you can simply send a request using the access token you just created:
curl -x token:<TOKEN_STRING>@<remote-server-IP>:<Port> \
  "target-site.com"
Yes
You can check if your public data was collected here:https://brightdata.com/check_your_data.
We never collect private data. We only collect publicly-available data.