Account
Policy
Privay & Security
Billing & Pricing
Usage Monitor
FAQs
Proxy networks
There are two types of IPs that we offer within our Residential Proxy:
IPs that are shared across multiple users. Connect to our entire network of 72+ million Residential IPs. Rotate between countries, cities, and ASNs using the Proxy Manager, Extension, or raw API commands.
Cost is calculated per GB consumed, according to your monthly plan.
Geolocation targeting
The IP allocated to your zone will be from the selected country, city, ASN, or zip code. Select the needed parameter from the drop-down menu.
Sending a request with Geolocation:
- With a ‘Shared’ IP, you’ll be able to control your geolocation targeting when you send a request.
- To target a specific country, add the
-countryflag to your request,
For example, if you’d like to send your request from the United States (‘us’), your request using a shared IP will look like
curl "http://target.site" \
    --proxy brd.superproxy.io:22225 \
    --proxy-user brd-customer-<CUSTOMER_ID>-zone-<ZONE_NAME>-country-us: <ZONE_PASSWORD>
To integrate the proxies into your code, please visit the API examples page, which can be accessed via your zone’s settings, under “access parameters”:
On this page, you can choose integration examples for most modern coding languages, just choose the integration type, your proxy zone, coding language, etc. and the page will generate a code snippet you can use right away.
Check out a few examples in the API examples page mentioned above (just choose “other software” in the “language” drop-down menu), or check our Integrations page, where we have specific guides to integrate our proxies within the most popular tools across the industry today.
To target a specific country:
- Make sure your specific proxy zone is configured to use IPs from that country. You can see this in your proxy zones “Configuration” tab under Geolocation Targeting
- When sending your request, add the
-countryflag, after your zone’s name in the request, followed by the 2-letter ISO code for that country.
In the example below: We added -country-us to our request, so we will send a request originating from the United States (“us”).
curl "http://target.site" \
  --proxy brd.superproxy.io:22225 \
  --proxy-user brd-customer-<CUSTOMER_ID>-zone-<ZONE_NAME>-country-us: <ZONE_PASSWORD>
You can target the entire European Union region in the same manner as “Country” above by adding “eu” after “country” in your request: -country-eu
Requests sent using -country-eu, will use IPs from one of the countries below which are included automatically within “eu”:
AL, AZ, KG, BA, UZ, BI, XK, SM, DE, AT, CH, UK, GB, IE, IM, FR, ES, NL, IT, PT, BE, AD, MT, MC, MA, LU, TN, DZ, GI, LI, SE, DK, FI, NO, AX, IS, GG, JE, EU, GL, VA, FX, FO
In order to target a specific city you will need to use a Shared (pay-per-IP) or Dedicated proxy network.
When configuring your proxy zone, after selecting your preferred country, you can add a city, to further specify your geotargeting
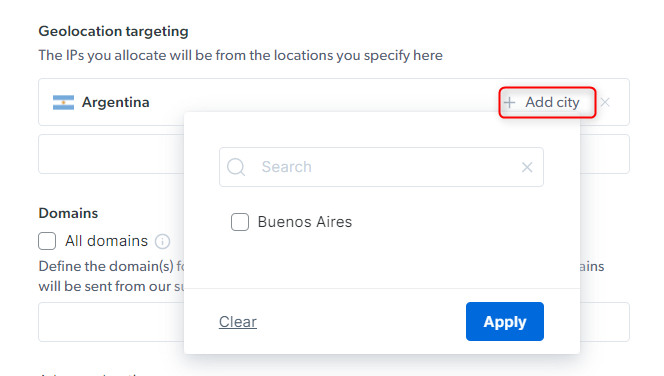
Once you click on ‘Add city’ you will be displayed the available cities to target, for the selected country. In order to check the number of available IPs for a specific geolocation.
Once configured, you’ll be able to send requests from the selected city, using the following syntax
curl "http://target.site" \
  --proxy brd.superproxy.io:22225 \
  --proxy-user brd-customer-<CUSTOMER_ID>-zone-<ZONE_NAME>-country-<COUNTRY>-city-<CITY>: <ZONE_PASSWORD>
When selecting a two-word city it’ll be written as one word.
For example, when targeting Buenos Aires the syntax of the request will be:
-country-ar-city-buenosaires
To view more geotargeting examples, you may want to review our proxy integration examples page.
To review the list of IPs allocated to your zone, simply navigate to ‘My proxies page’, click on your Proxy zone, scroll down to the ‘Allocated IPs’ section, then simply click ‘Show allocated IPs’ or ‘Download IPs list’.

The event log will show you (at most) the last 200 requests you made with any zone in your account.
In your Bright Data control panel’s proxies page: https://brightdata.com/cp/zones
Go to the “Event Log” tab:
The presented data is:
- Date: Time and date of the request
- Zone: What Zone was used for the request
- Source IP: What IP the request was made from
- URL: The target site of the request
- Result: Success or Fail of the request
There are 2 ways to view your zones statistics:
- To see stats across all your zones, go to your dashboard:
- To see stats for a specific zone, go to that zone’s settings and click the “statistics” tab:
The 100% uptime was built to prevent any ‘external’ events from affecting the user. The idea is simple and works the same way for both problems described above – if our system detects a problem, like a connectivity issue or an IP where the GEO isn’t exactly what you asked for when buying that IP, we will automatically route your requests through other IPs which are exactly the same as the original IPs.
At the same time, we wanted to make sure that customers that must use specific IPs will not be affected – so we made some exceptions:
- If a specific IP is targeted in your request we will not assign a fallback IP to it
- 100% uptime will not interrupt a live connection. If the fallback is needed, it will play in once the next connection is established
The 100% uptime brings immediate value by providing 100% connectivity and continuous high-performance level, free of charge and without having to make any changes in your code or how you work.
100% uptime feature can be turned on or off, via API.
Navigate to your proxy configuration settings, and under ‘Permissions’ enable ‘100% uptime’

By default, all proxy zones have unlimited usage, and you can set a limit by one of 4 parameters:
- $/day
- $/month
- bytes/day
- bytes/month
To set this limit on one of your zones, from Bright Data’s ‘My proxies page’
Go to any of your zone's settings by clicking on that zone.
Go to the "Access parameters" tab.

Scroll down to "Limit", the default value is "unlimited"
Click the "edit" button

Enable the "spend limit" option.

Set the parameters you wish to work with and click "update"
You'll see the change back in the Limit section and the proxies page, in the Usage/Spend Limit column.
- This can be done by adding the session flag to the proxy username:
brd.superproxy.io:22225 br-customer-{YOUR_CUSTOMER_ID}-zone-{YOUR_ZONE}-session-rand39484
Generate the random number on thread startup, and change it when you want to change the Proxy Peer assigned for the thread’s connection.
- Session ID can be any random string/counter: requests with the same session string will use the same Proxy Peer (as long as possible); requests with different session strings will be assigned different Proxy Peers.
- To force an IP change, just modify the session ID
- If an assigned Proxy Peer(exit node IP) becomes unavailable, the Super Proxy will return an error “502 - No peers available” for the first request and then on the second request the super proxy will assign a new peer even if you do not change the session ID.
- The Session IP is kept persistent for up to 1 minute of idle time. After a minute with no requests, the IP is released back to the pool.
To keep this Session/IP for longer, send a tiny keep-alive request every 30 seconds, to prevent this session from becoming idle for over a minute.
This request may be anything small, such as /favicon.ico, or even a request that returns 404 (as long as the web server does not disconnect the socket due to this request). - If you have multiple Clients and would like to ignore your Clients source IP (which is used together with your session ID to create a session), then you want to use a global session then add
glob_as a prefix to your session:
brd-customer-{YOUR_CUSTOMER_ID}-zone-{YOUR_ZONE}-session-glob_rand39484
Full request example:
brd-customer-CXXXXX-zone-ZONE_X-session-glob_rand39484
Generate the random number on thread startup, and change it when you want to change the Proxy Peer assigned for the thread’s connection.
To add IPs to a zone’s blacklist/whitelist, there are 2 ways:
-
Via the control panel:
- Go to any of your zone’s settings, and click the “access parameters” tab.
- Scroll down to the “IPs” and “target host” sections, as they are both responsible for white/blacklisting IPs and domains, respectively:
Add all the relevant IPs and domains you’ll allow access to with your proxy zone.
-
Via API endpoints:
-
Important tips re whitelist:
- IPs that should be whitelisted are your machine’s IPs that you’ll be sending requests with, not the proxy IPs in your zones.
- We strongly recommend whitelisting your IPs wherever possible, since when the whitelist is empty, you run the risk of getting your non-whitelisted IPs temporarily blocked in the case where our automatic security blocking system detects any irregular activity. See more info within this video.
- There is no limit on how many IPs/domains you can add to the whitelist and we also support ranges of IPs.
Example for adding domains:
- Example for adding IPs:
Ports 80 and 443 are available by default, supporting HTTP and HTTPS protocols.
The below table shows supported protocols by port:
| Port | Protocol |
|---|---|
| 80 | HTTP |
| 443 | HTTPS |
Bright Data can support additional ports by request. Every request to support a new port will be followed by a dedicated and additional compliance process with the Bright Data compliance team.
Examples of ports that require Bright Data compliance review before activation:
| Port | Protocol |
|---|---|
| 43 | WHOIS |
| 8443 | HTTP |
| 8243 | HTTPS |
To make a request to add a port permission to your zone:
- Go to your zone’s settings (it will open on the “configuration” tab by default, if not, please click it)
- Scroll down to “advanced options” and click it
- Enable “ports”
- Input the port numbers you would like to get approved
- Fill out the form and wait for our compliance team to contact you and approve the request
Bright Data allows targeting the following Operating Systems:
curl --proxy-user brd-customer-<USERNAME>-zone-<ZONE>-os-windows:<PASSWORD> \
	--proxy brd.superproxy.io:22225 \
	"<TARGET SITE>"
If you’ve selected ‘Pay per IP’ shared, or a dedicated IP type in your zone configuration, you’ll be allocated a fixed IP address. From time to time, depending on your use case, you may need to refresh these IP addresses.
In order to refresh IPs allocated to your zone, navigate to your selected zone, under ‘Allocated IPs’ click on ‘Show allocated IPs’, check the box of the IP or gIP you wish to refresh and click ‘Refresh’
Please note: Refreshing an IP or gIP will result in an extra charge.
Alternatively, you can use API to refresh your dedicated Residential IPs or your Datacenter/ISP IPs
When using Bright Data’s Residential Proxy network, you may find the need to use a specific IP allocated to your zone.
- Send a test request with a ‘—verbose’ or ‘-v’ option added (this will turn on verbose logging)
curl "https://lumtest.com/myip.json" \
  --verbose \
  --proxy brd.superproxy.io:22225
  --proxy-user brd-customer-<CUSTOMER_ID>-zone-<ZONE_NAME>:<ZONE_PASSWORD>
- Locate the x-brd-ip response header and copy its value
-
Add the -ip- flag to your request, after your zone’s name and use the hashed IP value copied in the previous step
-
Send a test request, and review the response
curl "https://lumtest.com/myip.json" \
  --proxy brd.superproxy.io:22225
  --proxy-user brd-customer-<CUSTOMER_ID>-zone-<ZONE_NAME>-ip-<HASHED_IP>:<ZONE_PASSWORD>
We recommend using https://lumtest.com/myip.json as the target domain for testing, and to review your IP credentials.
This feature can be enabled by adding the ASN parameter to your Zone configuration, under Geolocation Targeting.
Once the configuration is saved, the ASN flag can be added to the Zone’s credentials
and be integrated when using the Residential proxies. For example:
curl --proxy brd.superproxy.io:22225 \
  --proxy-user brd-customer-<USERNAME>-zone-<ZONE>-asn-<ASN number>:<PASSWORD> \
  "<TARGET SITE>"
Note: Values for ASN number can be found here.
Dedicated Residential IPs can be selected in the form of gIPs. They can be allocated under the zone’s configuration page by selecting a “Dedicated” IP type and choosing a number of gips. Also targeting a specific domain is required.
Once the configuration is saved, selecting “Show allocated Dedicated residential IPs” will provide
a list of hash values that represent group IPs.
These values can be used to target a specific gip. For example:
curl --proxy brd.superproxy.io:22225 \
  --proxy-user brd-customer-<USERNAME>-zone-<ZONE>-gip-<gip_hash_value>:<PASSWORD> \
  "<TARGET SITE>"
Long-Session Peers enables you to maintain a stable IP address for an extended period, ensuring seamless and consistent scraping operations. Unlike regular Residential IPs, where the IP can rotate at any moment if the peer unexpectedly disconnects, Long-Session Peers provide continuous sessions.
Enabling Long-Session Peers
Simply, go to an existing Residential zone or open a new one and toggle on the ‘Long-session peers’ feature. Now your future requests will only be routed through known long-lasting peers.
Note: This feature does add an extra cost for the zone when enabled
Where re These Peers From?
Our Residential peers’ pool consists of real users around the world who opt-in to use our product. As part of the opt-in, we utilize the IPs of these real users during their “down” periods as part of our ethical peer-to-peer network. By enabling Long-Session Peers, you ensure that you will be routed through peers who are known to stay active for extended periods of time, and can maintain a single IP address for a much longer period of time in comparison to regular Residential peers.
Benefits of Long-Session Peers
Consistent scraping operations: This stability minimizes disruptions caused by IP changes and maximizes the efficiency of your scraping tasks. You can rely on a consistent IP address for an extended period, allowing for long-duration scraping operations. This feature is particularly useful for projects that require continuous data extraction or monitoring.
When outside of China
Targeting Chinese Residential IP peers is enough:
curl --proxy brd.superproxy.io:22225 \
  --proxy-user brd-customer-<USERNAME>-zone-<ZONE>-country-cn:<PASSWORD> \
  "<TARGET SITE>"
When inside ChinaIn addition to Targeting Chinese Residentials IP peers, targeting our Chinese super-proxy is also required.
- When using API commands, the proxy DNS server isservercountry-cn.brd.superproxy.io
curl --proxy servercountry-cn.brd.superproxy.io:22225 \
  --proxy-user brd-customer-<USERNAME>-zone-<ZONE>-country-cn:<PASSWORD> \
  "<TARGET SITE>"
- When using the Proxy Manager:
- Select relevant Port settings by simply clicking on the port
- Select Targeting and set China as the country
- Select IP control: set Super Proxy location to “China”.
- Select relevant Port settings by simply clicking on the port
- You can choose to use a specific carrier from this list:
a1, aircel, airtel, att, celcom, chinamobile, claro, comcast, cox, digi,
dt, docomo, dtac, etisalat, idea, kyivstar, meo, megafon, mtn, mtnza, mts,
optus, orange, qwest, reliance_jio, robi, sprint, telefonica, telstra,
tmobile, tigo, tim, verizon, vimpelcom, vodacomza, vodafone, vivo, zain,
vivabo, telenormyanmar, kcelljsc, swisscom, singtel, asiacell, windit,
cellc, ooredoo, drei, umobile, cableone, proximus,tele2, mobitel, o2,
bouygues, free, sfr, digicel
- For Example
brd-customer-{YOUR_CUSTOMER_ID}-zone-{YOUR_ZONE}-carrier-dt
Geolocation databases (GeoDB) are used by internet websites to query information about the IP address used by the users. Bright Data monitors and maintains correct records of the 4 main GeoDBs used today: Maxmind, ip2location, db-ip and Google.
There are many other smaller GeoDBs, most of which are using outdated records or flawed testing methods, and so the information they present is not accurate or is presented to lure their viewers to buy VPN or proxy products from them. Therefore, we highly recommend using the GeoDBs mentioned above when testing your IPs.
In order to see our information about the proxy IP that you are using, browse one of the following:
What products support targeting search engines?
Use one of the following products to collect data from search engines:
* SERP API: this product operates with a proxy interface, performs automatic website unblocking, and provides results in HTML or JSON. It is customized for collecting data from search engines and their different sections, such as hotels, maps, trends, etc.
* Web Scraper IDE: A fully hosted API that allows building and operating a data collection in our IDE. This product includes fully automated unblocking, various output formats, scheduling, batch mode or single query, and more.
What happens if I target search engines through a proxy network?
When attempting to target search engines through a proxy network, you will be blocked, meaning your request will not exit our system and you will receive the following error message in the response headers:
HTTP/1.1 403 Forbidden domain
**X-Luminati-Error: Forbidden**: requests to this domain are blocked using the Datacenter and ISP proxy networks; please get access via a SERP API zone or contact your account manager to assist
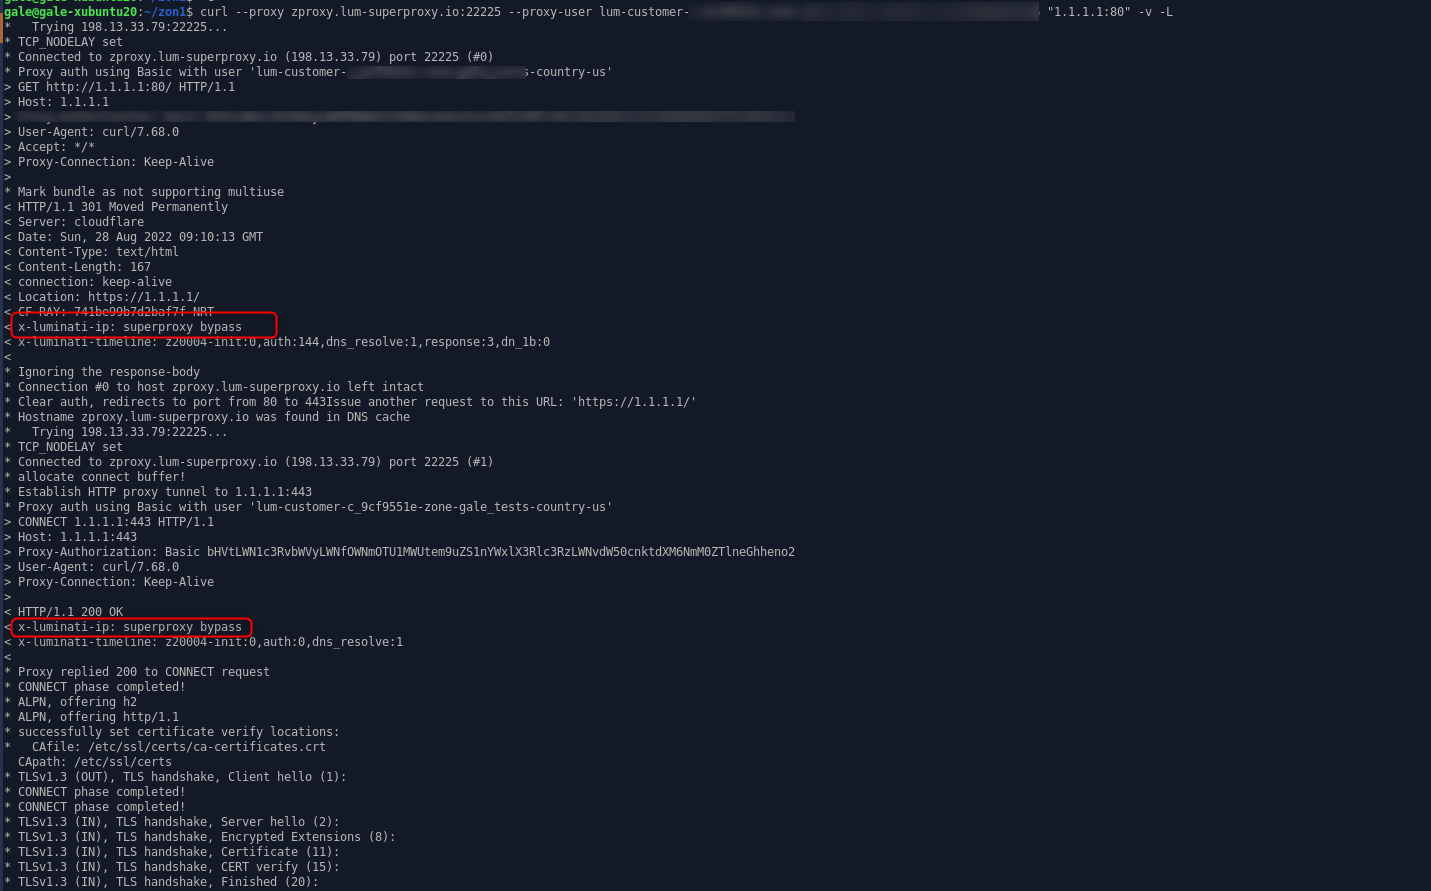
When targeting search engines through the Residential or Mobile networks, the request will not go through the Residential or Mobile peer but instead will be sent directly through one of our super proxies. The reason for this behavior is to support the integration of the Residential and Mobile networks with a browser, which might need to load search engine resource endpoints from the target website.
In case you target a search engine domain using Residential or Mobile networks, the request will be passed directly through the super proxy, and the following response header will serve as an indication:
x-luminati-ip: superproxy bypass
Yes, you can assess the number of IPs available per country through this interactive diagram.
First, select the country from the drop-down menu. The number of available IPs in that country appears below.
No - requests directly to the host server, and not to the domain name are forbidden while using Bright data.
Requests using URL format such as 1.1.1.1:443 will be executed using the super proxy server, not the proxy peer IP.
Example of a request using the super proxy:
Since BrightData cares about our community and peers quality, SMTP requests which can be used for spamming are block. Please note that mail domains are also blocked from access, and requests to mail domains will be sent from the super proxy server, and not the peer IP.
- You can choose to perform the request from the super proxy directly instead of the IP of the peer. In that case the IP of the request will be the one of the Super proxy. You will need to add ‘-direct’ to your request authorization string.
lum-customer-{YOUR_CUSTOMER_ID}-zone-{YOUR_ZONE}**-direct**
How did we calculate this table?
Your company needs to collect information from the web by sending 1,000 http requests per hour to a specific website. You write the scraper code and run it through a server. The target website allows 50 requests per minute from the same IP before blocking your scraper. Now, you have to purchase more proxies.
Assuming you choose datacenter proxies:
You don’t want to share IPs, so you buy 200 dedicated data-center IPs. You code the integration of the scraper with the new data-center proxies for 2 hours and then run the new program. This time, it takes 3 days for your target website to detect your scraper. Once your proxies are detected, you’ll have to purchase new proxies and repeat this process again, checking each day to make sure the proxies haven’t been detected. Cost per month (all numbers are from real customers):
- 200 dedicated IPs: $500
- Bandwidth: (1000 request X 20KB per request X 24 hours X 30 days = 14.5GB): $3 per month
- Developer (2 hours integration X 10 + 1 hour every 3 days for managing the proxies): ~3 days of work a month or ~$900
Your total cost per month will be at least $1400 for just these things alone, and the salary of $30 per hour for a developer is very conservative. Additionally, this doesn’t account for a lack of information reliability if your target website sends misinformation before blocking you or if your information flow is cut every few days, which can be detrimental to your brand or your revenue stream.
Assuming you choose Bright Data residential proxies:
You buy a basic package of 40GB with access to unlimited residential IPs. It takes 2 hours to integrate your scraper. Due to an average of 3 million residential IPs available each day, your target website can’t detect your scraper, allowing you to focus on other projects.
The bandwidth and unlimited IPs cost just $500 per month. Your information is always reliable because your requests are always successful and access is never cut in the middle of the month. When your business grows as a result of this scraping and your projects exceed 600MB each month, the difference in costs can be much higher than just ~$1000.
Bright Data also allows you to suspend your account when not in use, so your cost can be lower than $500 per month. Start by using the $5 voucher for free data-center traffic to test Bright Data’s benefits and then ask for access to our residential network for cheap and reliable data collection.
To install the SSL certificate, kindly proceed with the following two-step guide:
- Download
- Installation
How to download the SSL certificate
- Click with the right mouse button on this link
- In the opened list, select “save as”
- In the opened window, click the “Save” button

Installation of the SSL certificate
Please go ahead and install it as described below in your preferred browser.
If you run custom code, then you can either:
- Ignore SSL errors on your side by setting a relevant flag in the code
- Add our certificate as a trusted CA. The instructions below
- Once you’ve download the certificate file (see the instruction on the top of this article)


